linehomedotaboutdotmy galleryline

Saturday, October 10, 2015

Texture Play aka Inky Fingers Class

So thankfully there was Crop & Create recently because I still haven't found much time for crafting!  I finished up my Folio recently which was from the Texture Play Class at this year's much anticipated Crop & Create Event in September.  I was looking forward to this class the most and it was well worth the wait.  Vicki Boutin taught this class as well as the Fundamentals of Distress class at last year's event.  She NEVER disappoints!!

The folio - just gorgous!!  Look at that ribbon - it is seem binding ribbon coloured with Distress inks.  And the word band was distressed with Picket Fence Paint.

I had seen sneak peeks before the Event of this dragonfly and couldn't wait!!  This was our first project in the class -   we inked it up by generously with Distress Inks and then generously applied Rock Candy Distress Crackle Paint.  After it was dry and the cracks had appeared we applied Chipped Sapphire Distress Stain to the tips of the wings and then a bit of Brushed Pewter Distress Stain.  Pumice Stone ink was applied to the body.
Here you can see the inside completed. 
The tags are meant to be adhered to the flaps inside the folio. I just haven't done that yet. 
First up was the Gold Embossed Texture Paste tag.  After applying the texture paste we applied gold embossing powder and let it dry.  Once it was dry we then heat embossed it so it wouldn't get too puffy.
Here you can see a close up of the gold embossing paste and the silver Distress Stain which was sprayed and dripped. 
Clear Embossed Stamp Tag - the image was stamped with distress ink and heat embossed with clear embossing powder.  Then we inked the tag and did some water droplets to create 'water marking'.  
Love how the Crushed Olive ink looks gold.
Tissue Wrapped Texture Tag - tissue tape was added with multi medium underneath.  We inked the tissue and added Picket Fence Distress Paint with our fingers to mute the ink.  then we added Tarnished Brass Distress Paint through a stencil with a sponge.
That feather!!  A bit of Rock Candy Distress Crackle Paint was applied to the tip.  Once dry we applied some Tarnished Brass Distress Paint.
Texture Paste Stamped Tag - texture paste was applied to the tag.  Once dry we inked the tag and stamped it.  We brushed over the texture paste with some Brushed Pewter Distress Stain and after that was dry applied Pumice Stone Ink by brushing over the paste with the pad.
Love the shimmer from the Distress Stain.  
Debossed Tag - we used the debossed side of the tag and applied Distress Inks.  Then we misted the mat with Brushed Pewter Distress Stain and dragged the tag through.  A little bit of Pumice Stone Distress Ink was brushed over the tag as well.  
I love how the ink colours remain in the debossed areas and the stain and Pumice Stone ink was only applied to the surface.
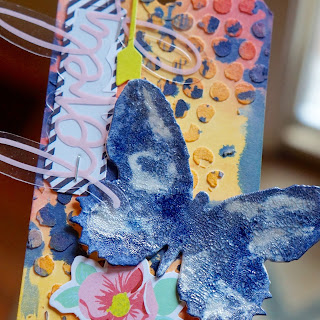
Tinted Texture Paste Tag - I love the bright colours we used on this tag.  The background was created by inking over the texture paste (which was tinted pink) and then we applied Chipped Sapphire Distress Stain.
This gorgeous butterfly was created by applying the Rock Candy Distress Crackle Paint before the ink.  The crackle didn't completely cover the butterfly.  After it was dry we applied the Chipped Sapphire and Brushed Pewter Distress Stains.

That's Vicki in the background giving us the peace sign :)

Sunday, September 27, 2015

Project Life 2015

A few months ago I decided I was going to start a Project Life album for 2015.  It was June, so I had a few months to go back on.  Well, life got busy with summer - camping, racing, travelling - all that fun stuff and I'm just starting January now.  I also invested in a new Canon Pixma printer over the summer for my photo printing.

So here is my cover page or title page for my album.  I joined Studio Calico's monthly Project Life kit subscription so I receive a kit each month.  I really love their style.  This is from the January kit Far Far Away.  I don't plan to do weekly spreads as I'm positive I wouldn't be able to keep up.  I plan to do it monthly and the number of pages depending on what photos I have.


I decided to print my journalling from the computer since I'm not too fond of my writing.  I'm sure I won't always do this though but I wanted to try.  I like the look.


The gold twenty fifteen is a clear acetate overlay - it's so pretty over the cardstock.  The tiny label in the corner of the picture is a digital file from SC's September Brimfield kit.  I actually used the print and cut feature on my Silhouette :) and it worked perfectly!!


Thursday, September 17, 2015

Crop & Create Delivered - Summer Heat Wave Kit

In the spirit of packing and getting ready for the annual Crop and Create Event this weekend I thought I'd share the summer kit I picked up a few months back.  I've been sooo busy enjoying this summer, there hasn't been much creating going on and needless to say this kit has gone untouched.  So it is being packed to come along to the crop :)  Can't wait, it's always so much fun and I love the classes and kits and inspiration and hanging with my buddies for the weekend!!


Sunday, August 02, 2015

Color Theory Class - Lesson 2 - Complimentary Colors and Stamping into Acrylic Paint

Hello!!!  I am back :)  July was so busy with vacation and camp and company.  What a fabulous month which of course left me with no crafty time.  I would walk into my craft room, pick up a few things, browse my stash and then leave lol.

This weekend I did have some free time since I've been stuck at home with an infection so I decided to try Lesson 2 of the Color Theory Class from Studio Calico.  You can find Lesson 1 here if you want to check that out.  For this class we were to use complimentary colours and the technique of stamping into acrylic paint.  Sounded good to me :)


I'm using this heavy watercolour paper by Canson which was suggested in the class.  I love it.  I had to work fairly fast as once I had the paints spread out on the page they began to dry.  I used a roller stamp and ran it through the paints, washing it before moving to the next colour section.


I love the texture the roller stamp created in the paint and the added interest of the dots on the page.  I also loved that the red embellishments really popped against the green background.  The sentiment and swirly flowers (which I painted red) were cut files supplied with the class.


Thursday, July 02, 2015

CountryFest 2015

Hubby and I were able to get away for a week at the end of June and our destination was CountryFest 2015 in Cadott, WI.  We hopped in the motorhome and camped out for 5 nights at the festival.


SOOO much fun with friends and the entertainment was outstanding!!!  There was four days of all day concerts and here are some pics of my favourites.

Keith Urban was absolutely the best performance I've ever seen and I've seen quite a few concerts!!  We had really good seats :)


He played and gave his guitar away right behind us!!


Lee Brice!!  I was so impressed, loved his laid back kinda red neck style!!  And so many good songs!!


Tim McGraw - not the first time I've seen him, but I liked this performance  better than the last time I saw him.


Billy Currington - he was so awesome!!  So many good songs as well!


Thomas Rhett - this was a surprise - I loved him, he was pretty fun on stage and so young.  Great tunes too!!


Brett Eldredge - another surprise!!  He was good - good with the crown, I was impressed!!


Toby Keith - not the first time I've seen him either - what can I say he's Toby!!


Rascall Flatts - I really liked their stage show.


We're already booked for next year :)


Related Posts Plugin for WordPress, Blogger...