linehomedotaboutdotmy galleryline

Saturday, October 31, 2015

Art Journal Reveal - Happy Halloween

Here it is - another art journal page completed :)  As I mentioned in my last post Tracy and I had decided on a collage or halloween theme for this challenge.  I went with the halloween theme obviously :)  I was inspired by the pumpkin on a halloween tagI saw here.


I started by first applying some Tim Holtz rub-ons to my pages as I love this resist look after applying colour.  I dug into my halloween stash and found some black patterned papers from an older paper pad from My Mind's Eye called Mischievous and stamped the pumpkin from the Stamper's Anonymous Halloween Blueprints stamp set a few times.  I laid out the pumpkins and the tree (which was cut on my Silhouette) so I could see where I wanted the rubons.  Next I applied some texture paste with the Harlequin stencil in a few empty areas and let that dry.


Once the texture paste was dry I applied Distress Spray Stains in Spiced Marmalade, Crushed Olive and Seedless Preserves.  I misted with water to help the colours blend and then dried with my heat gun.  After that it was just a matter of adhering the pumpkins and tree with my collage glue stick.  I wanted to give some dimension to the front pumpkin by cutting out smaller sections and using some glue dots to pop them up a bit.  


In order to 'ground' the images I used a Black Soot Distress Marker to outline the tree and pumpkins and smudged it with my finger to blend.  You can see the difference in the photo below.


Last was to add some splatters of Black Soot Distress Spray Stain and a couple mists of Brushed Pewter Distress Stain and that was it.  


Hope you enjoyed the process :)  You can find Tracy's journal page here.  I love the silhouette images and how she created them.  And her moon is awesome!!

I'm entering this in Simon Says Wednesday Challenge - Anything Goes and Simon Says Monday Challenge - Throwback.  For my entry I'm going to back to last October's Challenge O is for.... October of course!!!


Thursday, October 29, 2015

6th Art Journal Page - Sneak Peek

Well hello!!  It's time for some Art Journalling :)  We kind of took the summer off, not intentionally but summer is busy and there's always so much going on.  Tracy and I had decided a while back that we were going to do something with collaging or a fall/halloween theme or both.  I got this idea in my head and it didn't have much to do with collaging but it's definitely halloween!!

Here's a few pics of me trying to decide on a colour combination:


Thursday, October 22, 2015

Did I Mention I Love Fall??

A couple weekends ago we had some gorgeous weather and I wanted to get out one more time to enjoy the fall colours.  This time my daughter, her boyfriend and my future cousin and I headed towards the border and visited Pigeon River Provincial Park and High Falls.  Here's a few pics:


Wednesday, October 14, 2015

Project Life 2015 - January

I finally finished my January Project Life pages.  It took a while to get started.  I decided to get a new Canon Pixma printer so I could print at home.  And then I got a photo editing program called Lightroom which I had to learn how to use.  It sure is harder learning new things at this age than it used to be.  I think my brain is full lol.  By no means do I know the program well, only enough to edit and print what I need so far.

Not a lot of pictures to work with the first few months of the year so the first few months will likely be limited to the two pages.  I'm using Studio Calico's monthly PL kit Far Far Away.


You can see here how the pages look beside each other.


Monday, October 12, 2015

I Love Fall

Just wanted to share a few pics from last weekend - hubby and I took a day and drove the North Shore of Lake Superior in Minnesota from Grand Portage to Silver Bay.  The colours of fall have been giving us quite a show.  We drive this way so many times a year and hardly ever get to take the time to stop and enjoy the views so this time of year was perfect - we made five stops along the way :)

1st stop - Grand Portage, MN (seeing this photo here I think it looks a lot like a painting)


2nd Stop - just outside Grand Marais, MN (I didn't realize it until I used both these photos here - it seems like my photo below is of the same area in the park sign)


Upper Falls


3rd stop - Tettegouche State Park at Silver Bay, MN


Two Step Falls


Baptism River


4th Stop - Sugar Loaf Cove, Schroeder, MN


Last Stop - Temperance River near Tofte, MN


I'll be sharing some more photos of my hike this weekend soon........


Saturday, October 10, 2015

Texture Play aka Inky Fingers Class

So thankfully there was Crop & Create recently because I still haven't found much time for crafting!  I finished up my Folio recently which was from the Texture Play Class at this year's much anticipated Crop & Create Event in September.  I was looking forward to this class the most and it was well worth the wait.  Vicki Boutin taught this class as well as the Fundamentals of Distress class at last year's event.  She NEVER disappoints!!

The folio - just gorgous!!  Look at that ribbon - it is seem binding ribbon coloured with Distress inks.  And the word band was distressed with Picket Fence Paint.

I had seen sneak peeks before the Event of this dragonfly and couldn't wait!!  This was our first project in the class -   we inked it up by generously with Distress Inks and then generously applied Rock Candy Distress Crackle Paint.  After it was dry and the cracks had appeared we applied Chipped Sapphire Distress Stain to the tips of the wings and then a bit of Brushed Pewter Distress Stain.  Pumice Stone ink was applied to the body.
Here you can see the inside completed. 
The tags are meant to be adhered to the flaps inside the folio. I just haven't done that yet. 
First up was the Gold Embossed Texture Paste tag.  After applying the texture paste we applied gold embossing powder and let it dry.  Once it was dry we then heat embossed it so it wouldn't get too puffy.
Here you can see a close up of the gold embossing paste and the silver Distress Stain which was sprayed and dripped. 
Clear Embossed Stamp Tag - the image was stamped with distress ink and heat embossed with clear embossing powder.  Then we inked the tag and did some water droplets to create 'water marking'.  
Love how the Crushed Olive ink looks gold.
Tissue Wrapped Texture Tag - tissue tape was added with multi medium underneath.  We inked the tissue and added Picket Fence Distress Paint with our fingers to mute the ink.  then we added Tarnished Brass Distress Paint through a stencil with a sponge.
That feather!!  A bit of Rock Candy Distress Crackle Paint was applied to the tip.  Once dry we applied some Tarnished Brass Distress Paint.
Texture Paste Stamped Tag - texture paste was applied to the tag.  Once dry we inked the tag and stamped it.  We brushed over the texture paste with some Brushed Pewter Distress Stain and after that was dry applied Pumice Stone Ink by brushing over the paste with the pad.
Love the shimmer from the Distress Stain.  
Debossed Tag - we used the debossed side of the tag and applied Distress Inks.  Then we misted the mat with Brushed Pewter Distress Stain and dragged the tag through.  A little bit of Pumice Stone Distress Ink was brushed over the tag as well.  
I love how the ink colours remain in the debossed areas and the stain and Pumice Stone ink was only applied to the surface.
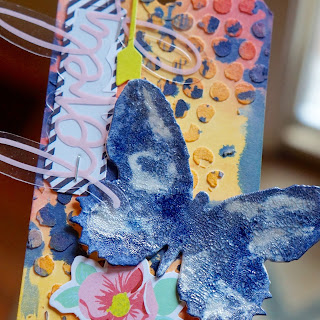
Tinted Texture Paste Tag - I love the bright colours we used on this tag.  The background was created by inking over the texture paste (which was tinted pink) and then we applied Chipped Sapphire Distress Stain.
This gorgeous butterfly was created by applying the Rock Candy Distress Crackle Paint before the ink.  The crackle didn't completely cover the butterfly.  After it was dry we applied the Chipped Sapphire and Brushed Pewter Distress Stains.

That's Vicki in the background giving us the peace sign :)

Related Posts Plugin for WordPress, Blogger...